
Buttermilk Waffles
Make a whole batch of these delicious buttermilk waffles and freeze some for homemade toaster waffles.
Servings 20 6-1/2-inch waffles (your waffle iron size may yield a different amount)
Ingredients
- 3-1/2 cups unbleached white flour
- 3-1/2 tablespoons sugar
- 4 teaspoons baking powder
- 1/2 teaspoon baking soda
- 1/4 teaspoon salt
- 3-1/2 cups buttermilk, shaken well
- 4 large eggs, beaten lightly
- 1 tablespoon vanilla
- 1/2 cup butter, heated just to melting (or mix of melted butter, melted plant butter and neutral cooking oil—your choice of proportions)
- a little oil for the waffle iron
- jam or syrup for serving
Instructions
- Start heating your waffle iron—for a basic model like ours, just plug it into the wall.
- Measure the flour, sugar, baking powder, baking soda and salt into a big bowl and stir with a fork.
- Put the buttermilk, beaten eggs and vanilla in a medium bowl and stir to blend well.
- Add the buttermilk mixture all at once to the dry ingredients and whisk everything together until it starts to look like a batter rather than some wet and dry things in disagreement. Add the melted butter/oil and keep whisking until things are blended. It is okay to have some tiny lumps.
- By now, the waffle iron should be nicely heated. Open the iron. Dab a bit of paper towel or lint-free cloth into the extra little bit of cooking oil and swipe it lightly over the surfaces of the waffle iron. (I do this even with our nonstick iron.) Pour in some batter—I use about 1/2 to 2/3 cup for each waffle. Close the iron and cook until the waffles are a nice golden brown—you may have to practice this depending on the way your waffle iron communicates with you. Open the iron, remove the waffle and either serve it to someone immediately or let it cool on a rack. (If you make the full recipe, you will have multiple racks strewn around the kitchen.)
- Repeat until you’ve used all the batter. Finally, eat! We usually cook and cook and cook waffles and then sit down and eat the final ones (with perhaps some this-doesn’t-count-as-eating snacking during the process).
Kitchen Notes
Freezing the waffles. Let them cool completely. The lead photo is a handsome presentation for serving, but if you are cooling them for freezer storage, let them sit out individually so they can also dry. When they are completely cool, put them in freezer bags, pushing out extra air, and freeze. To prepare a frozen waffle, pop it into your toaster, dividing into segments as needed to fit.
Timing. Your waffle iron will gradually get hotter, meaning the waffles will cook faster as this process moves forward. That’s why I did not provide a time for cooking one of these. And your waffle iron will likely tell you when it thinks the waffles are ready, with a beep or a little tone or a color-changing light.
No buttermilk? Buttermilk gives these a nice, subtle tang. If you don't have any, use regular milk, mixing in 1 tablespoon white vinegar or lemon juice per cup.
Savory waffles? Sure! Omit the sugar.
Liz’s Crockery Corner. I can’t remember where we got this wonderful dinner plate—maybe in Michigan, maybe in Iowa? It was made some time around 1820 by Thomas Heath in Burslem, now part of the city of Stoke-on-Trent in Staffordshire, England. The only mark on the back is a tiny incised stamp with the name HEATH. This pattern is usually called Heath’s Flower.
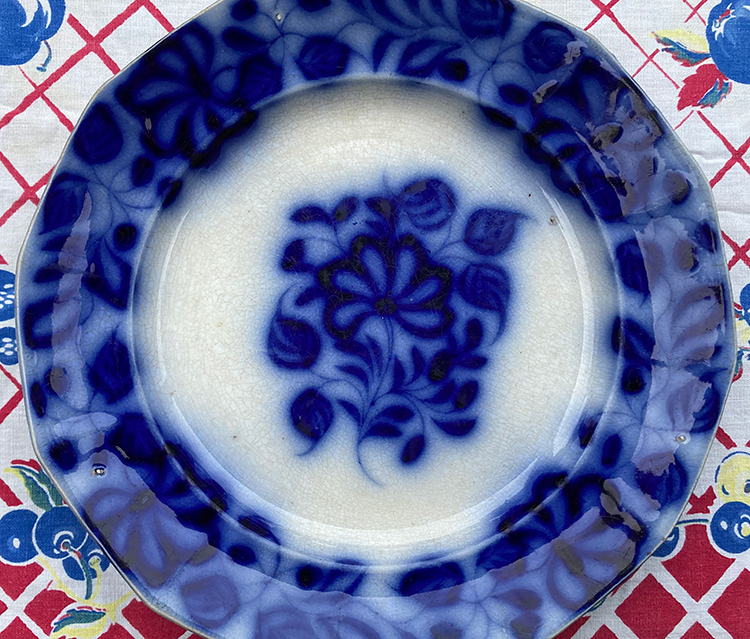 This is one of those dishes mass-produced by the English industrial potteries, crafted to loose standards for an eager American market. Its finish is not anywhere as elegant as pieces that would have been sold to the domestic English market. For instance, if you look closely, you may notice the very visible little white dots around the rim—those are marks left in the firing process by the spacers placed between dishes before they went into the kiln. There are some spots where the glaze has crawled a bit, or where brown spots got in before the glazing. The flowing blue color, which today we see as so gauzily beautiful, was itself originally regarded as a kind of messy mistake (but good enough for American hicks). It is also not unusual to find crockery with the transfer pattern clearly having slipped or with various other dings and mistakes that happened in the manufacturing process: the top of a cup or bowl out of round, a pitcher listing a bit one way or the other, a platter unable to sit flat on the table, so every time you set it down, it wobbles or clatters. But totter and clatter, these dishes still pleased the rapidly growing American market and Americans’ hunger for a bit of beauty and sophistication. And that these pieces have survived for so long shows how much they were, and still are, loved.
This is one of those dishes mass-produced by the English industrial potteries, crafted to loose standards for an eager American market. Its finish is not anywhere as elegant as pieces that would have been sold to the domestic English market. For instance, if you look closely, you may notice the very visible little white dots around the rim—those are marks left in the firing process by the spacers placed between dishes before they went into the kiln. There are some spots where the glaze has crawled a bit, or where brown spots got in before the glazing. The flowing blue color, which today we see as so gauzily beautiful, was itself originally regarded as a kind of messy mistake (but good enough for American hicks). It is also not unusual to find crockery with the transfer pattern clearly having slipped or with various other dings and mistakes that happened in the manufacturing process: the top of a cup or bowl out of round, a pitcher listing a bit one way or the other, a platter unable to sit flat on the table, so every time you set it down, it wobbles or clatters. But totter and clatter, these dishes still pleased the rapidly growing American market and Americans’ hunger for a bit of beauty and sophistication. And that these pieces have survived for so long shows how much they were, and still are, loved.